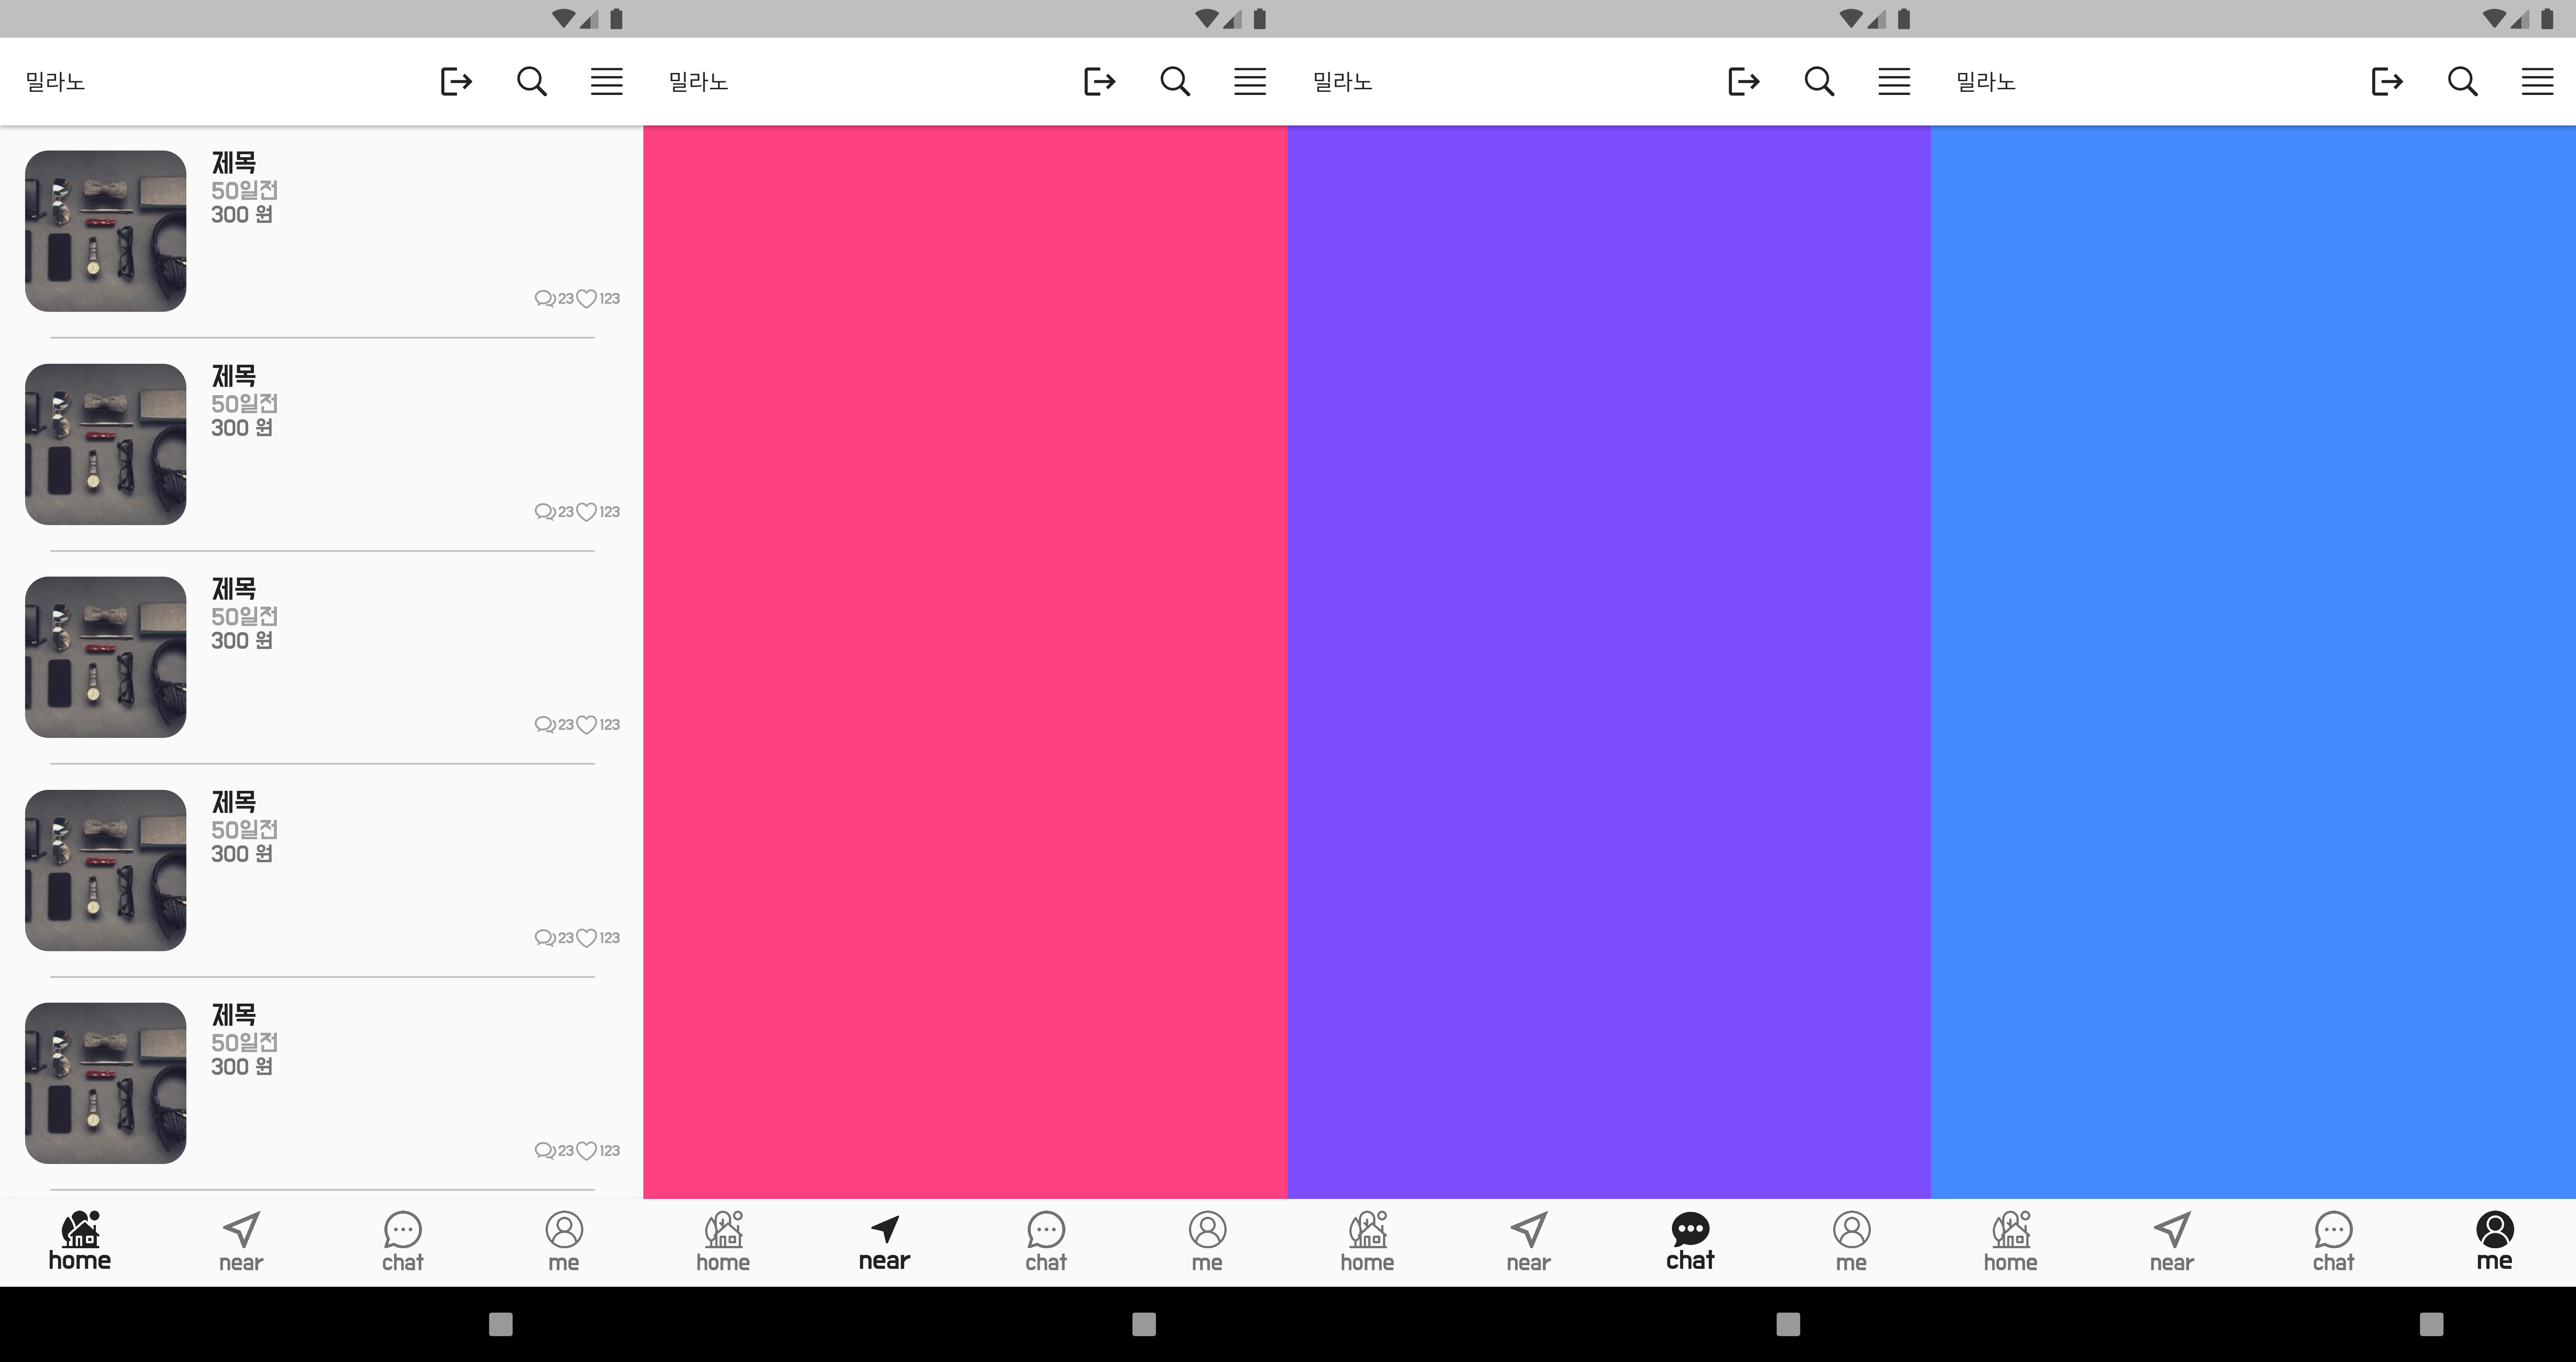
이번시간에는 로그인 이후 보여지는 HomeScreen, ItemsPage 화면을 구현해보겠습니다.
개발환경 : 윈도우11, 안드로이드 스튜디오, flutter 3.0.1
화면 구성은 아래와 같습니다.

./src/screens/home/home_screen.dart
import 'package:apple_market3/src/states/user_state.dart';
import 'package:flutter/cupertino.dart';
import 'package:flutter/material.dart';

import 'items_page.dart';

class HomeScreen extends StatefulWidget {
  const HomeScreen({Key? key}) : super(key: key);

  @override
  State<HomeScreen> createState() => _HomeScreenState();
}

class _HomeScreenState extends State<HomeScreen> {
  int _bottomSelectedIndex = 0;

  @override
  Widget build(BuildContext context) {
    debugPrint(">>> build from HomeScreen");
    return Scaffold(
      appBar: AppBar(
        // centerTitle: true,
        title: Text('밀라노', style: Theme.of(context).appBarTheme.titleTextStyle),
        actions: [
          IconButton(
            onPressed: () {
              // 로그아웃하면 '/auth' 로 이동
              UserController.to.setUserAuth(false);
            },
            icon: const Icon(Icons.logout),
          ),
          IconButton(
            onPressed: () {},
            icon: const Icon(CupertinoIcons.search),
          ),
          IconButton(
            onPressed: () {},
            icon: const Icon(CupertinoIcons.text_justify),
          ),
        ],
      ),
      body: IndexedStack(
        index: _bottomSelectedIndex,
        children: <Widget>[
          const ItemsPage(),
          Container(color: Colors.accents[1]),
          Container(color: Colors.accents[3]),
          Container(color: Colors.accents[5]),
          Container(color: Colors.accents[7]),
        ],
      ),
      bottomNavigationBar: BottomNavigationBar(
        // 아이콘이 선택되지 않아도 label 이 보이게 하는 옵션
        // shifting 으로 설정하면 클릭시에만 label 이 보임,
        type: BottomNavigationBarType.fixed,
        // 아이콘이 클릭되면 onTap 이 실행되고, 이걸 currentIndex 에 전달해야 함
        onTap: (index) {
          setState(() {
            debugPrint('BottomNavigationBar(index): $index');
            _bottomSelectedIndex = index;
          });
        },
        // 클릭된 화면으로 이동하려면 매핑해야함
        currentIndex: _bottomSelectedIndex,
        // free icons : flaticon.com 에서 다운로드
        items: [
          // 아이콘이 클릭되면 onTap 이 실행됨,
          BottomNavigationBarItem(
            icon: ImageIcon(AssetImage(_bottomSelectedIndex == 0
                ? 'assets/imgs/house_filled.png'
                : 'assets/imgs/house.png')),
            label: 'home',
          ),
          BottomNavigationBarItem(
            icon: ImageIcon(AssetImage(_bottomSelectedIndex == 1
                ? 'assets/imgs/near-me_filled.png'
                : 'assets/imgs/near-me.png')),
            label: 'near',
          ),
          BottomNavigationBarItem(
            icon: ImageIcon(AssetImage(_bottomSelectedIndex == 2
                ? 'assets/imgs/chat_filled.png'
                : 'assets/imgs/chat.png')),
            label: 'chat',
          ),
          BottomNavigationBarItem(
            // backgroundColor: Theme.of(context).bottomNavigationBarTheme.selectedItemColor,
            icon: ImageIcon(AssetImage(_bottomSelectedIndex == 3
                ? 'assets/imgs/user_filled.png'
                : 'assets/imgs/user.png')),
            label: 'me',
          ),
        ],
      ),
    );
  }
}
./src/screens/home/items_page.dart
import 'package:extended_image/extended_image.dart';
import 'package:flutter/cupertino.dart';
import 'package:flutter/material.dart';

import '../../constants/common_size.dart';

class ItemsPage extends StatefulWidget {
  // final String userKey;
  const ItemsPage({Key? key}) : super(key: key);

  @override
  State<ItemsPage> createState() => _ItemsPageState();
}

class _ItemsPageState extends State<ItemsPage> {
  @override
  Widget build(BuildContext context) {
    // 사진 사이즈를 화면 비율에 맞춰서 비례적으로 주기 위해서 LayoutBuilder 사용함,
    return LayoutBuilder(
      builder: (context, constraints) {
        Size size = MediaQuery.of(context).size;
        final imgSize = size.width / 4;
        return _listView(imgSize);
      },
    );
  }

  Widget _listView(double imgSize) {
    return ListView.separated(
      padding: const EdgeInsets.all(padding_16),
      separatorBuilder: (context, index) {
        return Divider(
          thickness: 1, // 실제 라인 두께
          color: Colors.grey[400],
          height: padding_16 * 2 + 1, // 라인 위/아래의 공간
          indent: padding_16, // 시작 부분 공간
          endIndent: padding_16, // 끝나는 부분 공간
        );
      },
      itemCount: 10,
      itemBuilder: (context, index) {
        return InkWell(
          onTap: () {},
          child: SizedBox(
            height: imgSize,
            child: Row(
              children: <Widget>[
                SizedBox(
                    height: imgSize,
                    width: imgSize,
                    child: ExtendedImage.network(
                      'https://picsum.photos/200',
                      fit: BoxFit.cover,
                      // borderRadius 를 사용하기 위해서는, BoxShape.rectangle 설정도 같이 해야함,
                      shape: BoxShape.rectangle,
                      borderRadius: BorderRadius.circular(15.0),
                    )),
                const SizedBox(
                  width: padding_16,
                ),
                Expanded(
                  child: Column(
                    crossAxisAlignment: CrossAxisAlignment.start,
                    children: <Widget>[
                      Text('제목', style: Theme.of(context).textTheme.subtitle1),
                      Text(
                        '50일전',
                        style: Theme.of(context).textTheme.subtitle2,
                      ),
                      const Text('300 원'),
                      // 금액과 하트 사이에 공백을 최대한 주기위해서 Expanded 사용함,
                      Expanded(child: Container()),
                      // Row 가 2번 사용된 이유는 아래와 같다.
                      Row(
                        // 오론쪽 끝으로 정렬하기
                        mainAxisAlignment: MainAxisAlignment.end,
                        children: [
                          // 폰트 사이즈를 줄이기 위해서 사이즈박스로 처리
                          SizedBox(
                            height: 16,
                            // 이걸로 다시 FittedBox 로 감싸면, 위젯 밖으로 나가지 못한다.
                            // 하지만 하위에 위치한 Row 정렬이 제 기능을 하지 못한다.
                            // 그래서 SizedBox 를 다시 한번더 Row 로 감싸고 정렬을 추가한다
                            child: FittedBox(
                              fit: BoxFit.fitHeight,
                              child: Row(
                                mainAxisAlignment: MainAxisAlignment.end,
                                children: const [
                                  Icon(CupertinoIcons.chat_bubble_2, color: Colors.grey),
                                  Text('23', style: TextStyle(color: Colors.grey)),
                                  Icon(CupertinoIcons.heart, color: Colors.grey),
                                  Text('123', style: TextStyle(color: Colors.grey)),
                                ],
                              ),
                            ),
                          ),
                        ],
                      ),
                    ],
                  ),
                ),
              ],
            ),
          ),
        );
      },
    );
  }
}
'Flutter > 12 Clone 'Used Goods app'' 카테고리의 다른 글
| [Flutter] Clone - 당근마켓17(firebase 환경설정 테스트) (0) | 2022.07.27 |
|---|---|
| [Flutter] Clone - 당근마켓16(Firebase 환경설정) (0) | 2022.07.27 |
| [Flutter] Clone - 당근마켓14(pageController with provider) (0) | 2022.07.26 |
| [Flutter] Clone - 당근마켓13(Shared reference) (0) | 2022.07.25 |
| [Flutter] Clone - 당근마켓12(geocoding & reverse geocoding) (0) | 2022.07.24 |

